Angular 2 is one of the fastest web app java script framework for building our web application.
It can be added to our HTML page using the <script> tag.
1) Angular 2 application anatomy:
>These components can be pulled together to form an application by defining an "Angular Module".
>Every Angular application has atleast one Angular module called the "Angular root module"(app) and also an application can have any number of additional angular modules including Angular feature module that consolidates the components into specific application feature.
2) Languages that can be used for developing Angular JS (Language Selection)
a) The JS Language specification feature is officially called the ECMAScript (ES).
Different versions of ES:
* ES 3 - Supported by older broswers
* ES 5- Current version
* ES 2015 (ES 6) - Must be Transpiled (compiled by a tool to ES 5) before the browser executes it...
3) Selecting an Editor :
4) Setting up Enviornment:
npm – Is a CLI utility that interacts with the repository of open source projects.
-- Package manager for java script
-- To install all lib of angular
-- Download from npmjs.comSetting up the Angular JS application manually: (Can be referred for documentation in www.angular.io)
Alternate steps:
a) Tooling :Angular CLI:
Its a CLI for generating
the setup files and boilerplate code for A2 application (including Scaffolding unit
and end to end test)
b) Starter files for building our application, i have referred from
git hub
https://github.com/Sachin-Suresh/Angular2-Getting-started--Components-Interpolation-and-Databinding-From the above github link, i have downloaded and pasted the APM Start into my work space folder in my drive say and opened using my VS code editor.
Understanding the directory structure:
> All the files specific for our application are under the app folder.
> These are the setup files:
5) Now we have to install all the libraries required for running our Angular 2 application:
* Open any terminal (i have used Babun tool) with the application root directory and type 'npm install'
* This installs all the libraries we need and typescript. Ignore the warnings.
* We get a tree structure in the end which shows the installation is complete.
* We get a node modules folder and typings folder post npm installation:
* Type npm start to start the application server.
* Once the server is started hit the below URL:
* Notice the code structure:
For every .ts file we get .map file and .js file
Process: The start script started the TypeScript compiler, which transpiled all the .ts file to ES js file (.js file) that browser can understand.
.map file: is the source map generated by the compiler which helps debug .ts code
To stop the server: use Ctrl +C
6) Modules
* Modules are used to resolve namespace issue in Angular2 application.
* In ES 2015, a module is a file and vice versa.
* We just create a file and write some code and import/export,
the file becomes a module.
* Angular 2 has something called Angular 2 modules.
7) Component:
A component includes:
a) A View defined in a template
b) Its associated code defined within a Class (Properties, Methods)
A Class becomes a function when we give a metadata.
c) Metadata defined with a Decorator (an angular component function)
Decorator is a function that adds Metadata to a class, its members.
Always prefixed with @
Example of a component in a TypeScript:
Explanation of the above code from bottom:
Class definition:
Angular convention of naming a class:
* classname followed by suffix 'Component'.
* This classname is the Component name.
* The root component of an application is 'AppComponent'
* Since the above class 'exports', it is called as an ES Module.
* The class 'AppComponent' has only 1 property 'pageTitle' of type string and no methods.
class <classnameComponent> {
//properties
propertyName: type = 'some value';
//methodNames...
}
Next, we need to define the template for the above class.? How...? Using the Metadata.
Defining a Metadata with Decorator:
We define the Angular Metadata, with the Angular Component function, by attaching to the class as a Decorator.
Format:
@Component( {objects
Properties...}
)
Importing
Some Angular library modules:
@angular/core
@angular/animate
@angular/htpp
@angular/router
...
Other list of Angular library modules can be found at:
http://www.npmjs.com/~angular
8) Bootstrapping the application:
Bootstrapping our app.component.ts:
Where the 'bootstrap' array defines the root component of the application ie AppComponent .
Working Code : A sample of the Angular 2 application demo has been uploaded in the git hub url below which covers:
a) Creating a component class, Decorator , App component
b) Building a template and using component as a directive. (ngIf anf ngFor)
c) Data Binding and Pipes.
https://github.com/Sachin-Suresh/Angular2-Getting-started--Components-Interpolation-and-Databinding-
INTERFACES
* To specify custom types, we can define Interfaces.
* Prefixed by I
* ES 5 and ES2015 does not support Interfaces, but TypeScript does!!
An Interface is :
ie) The class contains the properties and methods identified by each interface.
Example:
* An Interface is a specification:
> export interface interfaceName
> Body defines the set of properties : propertyName : propertydatatype
> methodName (listofparameters : dataType) : methodReturnType
* To use the Interface as a DataType
TIP: To hide unnecessary .js and .map files in Visual Code editor,
File->Preferences->WorkspaceSettings: add .js and .map in exclude settings
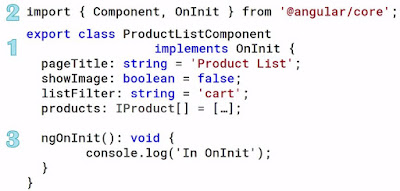
Using LifeCycle Hooks (Component Life Cycle)
Some of the major Life Cycle hooks are as:
To use a LC hook,
* We implement the LifeCycle hook Interface. (ie one Interface for each LifeCycle hook)
eg: The interface for the OnInit LC hook is OnInit
* Each LifeCycle hook interface defines one method whose name is the interface name prefixed with ng ie) for OnInit interface, method is ngOnInit


